Images in black and white and colour of high contrast scene,
together with examples of different techniques to adjust contrast
To show basic technique in judging contrast of scenes and
how to tackle exposure to achieve the results required
- 2 ways of measuring light (a) brightness of subject (i.e. amount of light it reflects) and (b) the amount of light falling on the subject (incident reading of light)
- Meters built into cameras only measure reflected light, whilst light meters measure both reflected and incident light
- All meters use the same principle when measuring reflected light: that is, they measure the average brightness of the scene
- Neither pure black or white are as reliable as a standard as neutral grey (i.e. a surface reflects 18% of the light striking it)
- Meters are set so that an average subject will appear as a mid tone (i.e. neutral grey)
- This is only useful if the average is mid-tone, but otherwise not (e.g. the meter will treat a pure white wall as neutral grey)
- Consequently, you must adjust exposure using TTL camera light meters for scenes that are over dark or over light
- In everyday life (e.g. in a traffic jam) frame a scene in front of you
- Identify the brightest and darkest spots within the frame
- Review those elements of the scene that are highlights, mid tones and shadows
- Consider the dynamic range of the scene and whether this lies within the camera’s capabilities
- You will realise over time that you are training your eye to see scenes more intensely
- Next speculate how the scene would change under different light (e.g. from afternoon to golden hour light or overcast to bright sunlight)
- Decide what light might best suit the scene for the effect which you want
Exercise instructions
- Find a scene with high contrast (i.e one that is likely to lie outside the dynamic range of your camera)
- Use the search for this scene as practice in judging contrast (also see Tip above)
- Look at the brightest part: what detail can you see?
- Look at the darkest part: can you see detail there?
- Measure the light in the brightest and darkest areas of the scene using the spot meter of your camera (else use a telephoto framed wholly on these areas)
- How many stops difference are there between the brightest and darkest parts of the scene
- Shoot the image at the average between the two exposure readings (both manual or matrix auto)
- Create a colour as well as black and white version of the image
- Explore ways in which to get a less lower contrast image
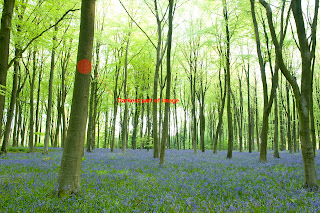
Micheldever Wood, Bluebells, May 2012
 |
| Exposure set for the darkest part of the scene - the trunk of tree in the foreground f16 @ 1/32, ISO 200 |
 |
| Exposure set for the brightest part of the scene - sunlight in the background f8 @ 1/16, ISO 200 |
The range is 4 stops between highlights and shadows in this scene
 |
| Matrix metered exposure f8 @ 1/20, ISO 200 |
 |
| Blended version from matrix metered average (2 versions created from adjustments in RAW) and exposure for shadows |

No comments:
Post a Comment